Apple Watch and Heart Rate Variability (HRV): a complicated relationship
How to address a few important limitations to make sure you can use the data effectively
If you are new to Heart Rate Variability, check out my Ultimate Guide covering measurements and data analysis.
The Apple Watch is the best-selling wearable sensor out there. It packs great technology but falls short when it comes to heart rate variability (HRV) analysis. As a result, it is of limited practical utility in this context, unless we take care of a few important aspects.
In this blog, I will discuss the main limitations and show you how you can make better use of the Watch data for your own analysis of physiological stress in response to training and lifestyle stressors.
Let’s start by considering a few important aspects of HRV analysis, and how they apply to the Apple Watch:
1. Collecting an accurate measurement: HRV is not the easiest signal to measure and is really prone to artifacts. Without an accurate device, we are collecting noise. The good news is that the Apple Watch is accurate when manually triggering a measurement, as shown in this validation. There is no validation of the Apple Watch's automatically collected data, which is also subject to changes in a way that makes it unreliable. See for example in the image below the differences in HRV when exporting twice the same data. If your HRV goes from 50ms to 100ms when exporting it a second time, something is really wrong. We have a usable device, but we cannot trust the processing provided. We will see below how to address this issue.

2. Protocol: collecting data at a meaningful time: random or sporadic sampling makes HRV data of no use in terms of assessing our physiological stress level, and simply reflects transitory stressors or the most irrelevant behaviors (e.g. drinking some water can double your HRV acutely). The autonomic nervous system (and therefore HRV) is affected by so many things that the most meaningful way to collect data actually representative of physiological stress is by measuring in a known, repeatable context, which means first thing in the morning. The only alternative to this protocol is to collect data during the entire night at high resolution. Unfortunately, sporadic night measurements provided by the watch are also ineffective, something I cover in greater detail here. On top of these issues, any type of motion leads to artifacts and inaccurate HRV data when using optical measurements, which are much more problematic than alternatives, for automated measurements. Hence, to make use of the watch for HRV analysis, we need to use it with a valid protocol, which I will discuss below.
3. Interpreting the data: lastly, once we have collected peak-to-peak differences we need to convert them to an HRV number and interpret that number. Both these aspects are currently poorly designed in Health, where metrics of limited utility are reported (i.e. SDNN instead of rMSSD), and where data is shown without a normal range. All these issues can be solved by using the Apple Watch with HRV4Training, which will perform the following three steps: 1) clean PP intervals and remove artifacts according to methods we have validated 2) compute rMSSD from clean PP intervals 3) interpret meaningful changes with respect to your historical data, so that you know when you are in a stable physiological state (an ideal situation, as discussed here), or not (e.g. more stress might be present). But let’s not get ahead of ourselves just yet.
Let’s dig deeper on all of these points so that we can see how we can make use of the Apple Watch effectively.
1. Collecting an accurate measurement
Using the Apple Watch, I could replicate part of the analysis shown in this paper, reading RR intervals from a Polar strap and PP intervals from Health, after triggering a measurement using the Breathe app and comparing them.
During data acquisition, I collected data for a few minutes while breathing naturally, and a few minutes while deep breathing, to trigger higher HRV. You can see in the plots below visually the effect of deep breathing as we get greater swings in RR or PP intervals:

You can see clearly an almost perfect correlation between Polar data and Apple Watch for all conditions (relaxed vs paced breathing as highlighted by bigger oscillations), meaning that the Apple Watch works really well in this modality. Note that this is not the data you have available in Health when looking at HRV, these are the recorded peaks, which then need to be transformed into an HRV number, after artifact removal. I will discuss this in more detail below.
2. Protocol: collecting data at a meaningful time
To me, the main challenge for today’s practitioners is not using one feature or the other, or one sensor or the other, but following a few key guidelines to make sure data can be correctly interpreted. Context and the morning routine are by far more important than using one tool or feature over the other. Unfortunately, devices that claim to do HRV all day like the Apple Watch does, often simply reporting random data points, are really making it harder to properly communicate these aspects, and this brings me to one of the most important points: measuring in a reproducible context.
Measuring at the right time: the morning routine
The autonomic nervous system (and therefore HRV) is affected by so many things that the most meaningful way to collect data actually representative of physiological stress is by measuring in a known, repeatable context, which means first thing in the morning. The only alternative to this protocol is to collect data during the entire night at high resolution.
If you are interested in measuring underlying or chronic physiological stress to potentially make adjustments to your lifestyle or training plan, then you would end up missing that information or confounding it with whatever is happening in your day (even just drinking some water), unless you are measuring using a valid protocol.
Automatically collected data during the night
While during the night we might think that being unconscious it’s an ideal moment to collect good data, this is not really the case unless we use the whole night of data (which is not possible with an Apple Watch). This is due to two aspects:
The circadian rhythm: HRV tends to increase during the night, as you rest (while resting HR tends to decrease). If we use a data point collected at 1am one day, and at 4am another day, then we might have large variability between the scores simply because they are far apart. At that point, it is much better to take a morning measurement when you wake up.
Sleep stages: HRV changes between different sleep stages (which is exactly why it can be used to try to estimate sleep stages). It follows that of course if the sleep stage affects HRV, the HRV reported is also affected by when during the night it was measured.
Here is an example:

We can see quite clearly that the two averages are different. However, due to the circadian component (HRV increasing during the night) and sleep stages (large minute-by-minute variation in HRV), it would be foolish to pick a single data point (or just a few) and use those as something representative of the physiological stress level for this person. Only continuous data, without gaps, can be used reliably in this context.
Note that these problems are automatically removed by a morning measurement as you are awake and therefore there is no sleep stage influence. For more considerations on night HRV data, please refer to this article where I cover in-depth the aspects briefly mentioned above.
Recommended protocol
Despite the fact that no third-party app can control the Apple Watch or take an HRV reading, the Breathe app that comes with the Watch consistently pushes HRV data to Health every time you use it.
Hence, you can, as a matter of fact, trigger an HRV reading using the Breathe app first thing in the morning, and disregard the rest of the data that is automatically collected.
This is in my view, the only meaningful protocol to use the Apple Watch for HRV analysis. If you are ready to start measuring your HRV using an accurate morning protocol, here is my recommendation in terms of the steps to take:

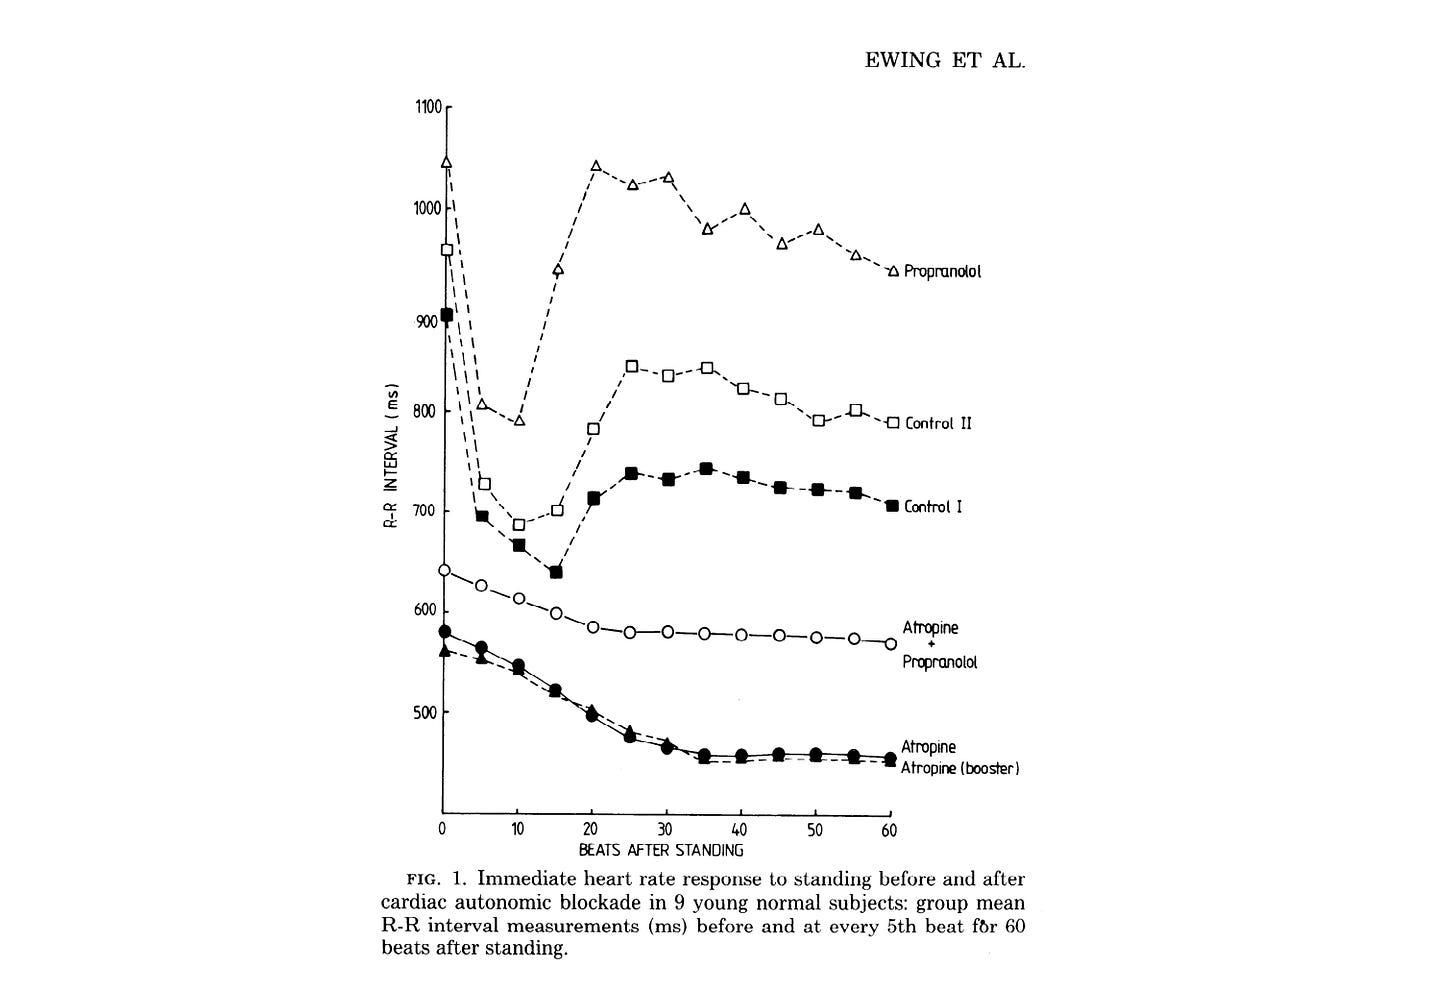
Wake up, go to the bathroom if needed, sit up, and measure for 1 or 2 minutes. As simple as that. Sitting up is quite an important step, as the orthostatic stressor makes the data more sensitive, and therefore more useful to capture our stress response.
When you change body position, it is the parasympathetic system that quickly re-normalizes heart rate. Hence, measuring shortly after changing body position, you capture the activity of the parasympathetic system. That's exactly what you want to measure with HRV (we cannot assess our response in the same way while sleeping, regardless of the sporadic sampling of the watch).
Note that you will find plenty of apps that will require no “work” and promise to provide you with estimates of your readiness based on data automatically collected by the watch. At this point, it should be clear that those apps lack both an understanding of the technology and of the physiology, and as a result, the data will be meaningless. Note also that HRV is not “a bit off” when measured outside of an optimal routine, but it is in fact completely meaningless, as there is a huge variation with respect to other signals you might be used to measuring. If you are not willing or able to use the watch with a morning routine, then it’s better not to use the watch at all for HRV analysis. Alternative devices that allow you to capture reliable data during the night are the Oura ring, Garmin watches, and the Whoop band (see some data, here).
3. Interpreting the data
Once you’ve collected your daily measurements for a while, there is something more to discuss: interpreting them. Let’s break this down into two sections, one about the metrics used (the HRV numbers), and one about how to interpret the HRV numbers once we have computed them.
Metrics
In Health, Apple reports HRV as the SDNN feature. This feature has a long history and was used mostly in the context of 24-hour measurements in medical practice. The idea is that by looking at SDNN we could get an understanding of cardiac variability changes throughout the day, as a response to circadian rhythm and acute stressors. It was mainly about distinguishing no variability at all (the inability of the system to react to any stressor, as it can happen in case of severe chronic conditions / disease) vs a healthy cardiovascular system. It wasn’t really about within-individual changes in parasympathetic activity, something we now understand is the most meaningful way to use HRV.
In this context, rMSSD, computed as the root mean square of successive differences between RR intervals, is the most useful feature. When computing rMSSD, we look at beat-to-beat differences, thus the rMSSD feature is associated with short-term changes in heart rhythm. Since parasympathetic activity impacts heart rhythm at a fast rate (e.g. < 1 second), rMSSD is considered a valid measure of vagal modulation and parasympathetic activity. Among the various features, rMSSD is the only one where mathematically we capture the physiological process we are interested in, but is not provided by the Apple Watch or in Health.
Using HRV4Training, we can read the RR intervals in Health, and re-compute features, therefore reporting rMSSD as opposed to the SDNN data you find in Health. Equally importantly, using our artifact removal, which we have fine-tuned on PPG data to make sure rMSSD is not impacted by motion artifacts, ectopic beats, or other issues, we can make sure the computed HRV is of high quality. No other tool on the market has anything to show when it comes to artifact removal, which is the single most important aspect of HRV analysis.
Let’s not collect noise because it’s free or convenient.
Interpretation
Finally, we got here. We have an Apple Watch. We use it for a morning measurement while sitting using the Breathe app. We then read the data in an app that can clean up artifacts and compute rMSSD. Only one step remains: interpreting this value. This is not an easy task, as there is no frame of reference for HRV (see also my blog on low HRV values, here).
HRV analysis requires a mindset shift. We need to shift from a “higher is better” to a “normal is better” mentality, as physiologically speaking, being in a stable condition is typically a good sign. Additionally, the inherent variability of HRV measurements is something that your app or software of choice, needs to deal with. This is something we have spent a lot of time researching and designing in HRV4Training.
An app or software that interprets any HRV increase as a good sign, or any HRV decrease as a bad sign, is failing to correctly represent the fact that there are normal variations in physiology, and that only variations outside of this normal range, should trigger concern or more attention or simply be interpreted as actual changes. Equally wrong is to interpret any high HRV value as positive.
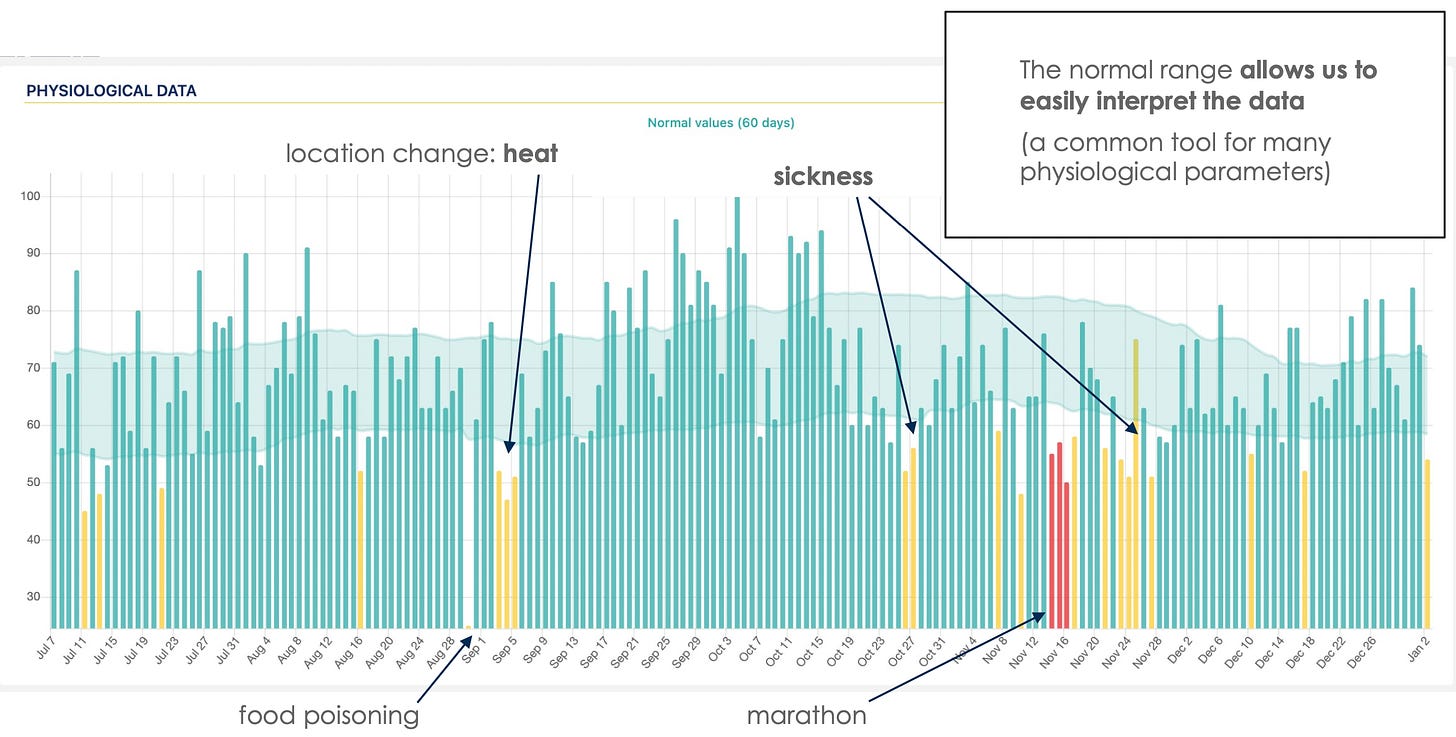
This is why we build what we call ‘your normal values’ based on your historical data so that we can compare daily measurements or your weekly baseline to your own frame of reference, to determine when you are consistently more stressed than normal.
Note that here we address two issues simultaneously by using a normal range:
We avoid naive, “higher is better” interpretations.
We assess which deviations are meaningful, and which ones are no concern, as they are either outside or within the normal range.
Here is what you’d be looking at with most tools:
While here is how you should be looking at HRV (as we do in HRV4Training):
From the figures above, we can see that by introducing a normal range and highlighting deviations from our normal, we can easily identify and interpret meaningful suppressions due to a number of stressors: environmental stress such as the heat, food poisoning, sickness and racing a marathon in this example.
This is the only meaningful way to use HRV data: collect accurate measurements in a known context, use a valid protocol, and interpret changes with respect to your normal range.
Getting practical: how to guide
Here is a brief overview of how to use HRV4Training with the Apple Watch, so that you can take a contextualized and reproducible morning measurement, reflecting your baseline physiological stress level, and then interpret it with respect to your own normal range, as determined in the app:
Select the Health app as data source under Menu / Settings in the HRV4Training app, then authorize HRV4Training to read HRV data and PP intervals from Health, when automatically prompted.
When you wake up, take a measurement using the Breathe app on your Apple Watch, while sitting and after going to the bathroom, but before drinking or performing any vigorous physical activity.
Right after you have taken the measurement, open the HRV4Training app on your phone, tap ‘Read from Health’ from the main screen, and that’s it. We’ll be reading the PP intervals, removing artifacts, computing rMSSD, and building your normal range.
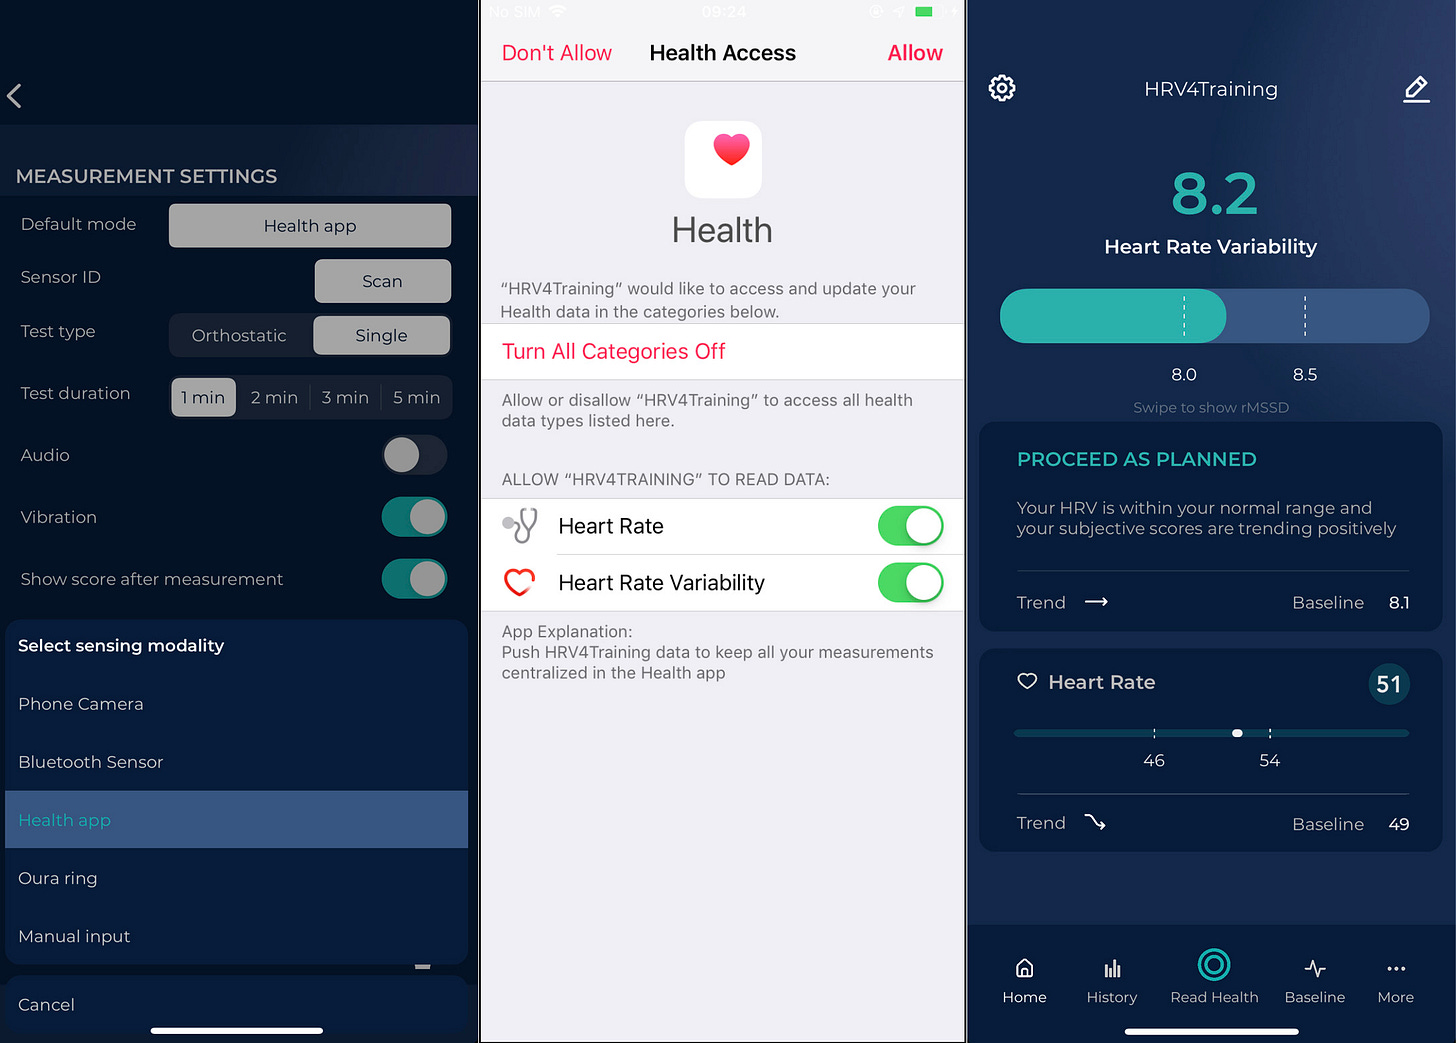
Once you do this for a few days, you’ll be able to see when values are consistently lower than your normal, often highlighting a period of higher stress that might require prioritizing recovery, in order to improve performance (or well-being) in the long run. At the same time, the app will be able to disregard day-to-day changes that are just part of the typical oscillations seen in HRV, showing a stable response.
Now, you are ready to include HRV in your training plan.
I hope this was informative, and thank you for reading!
Ways to Show Your Support
No paywalls here. All my content is and will remain free.
If you already use the HRV4Training app, the best way to support my work is to sign up for HRV4Training Pro.
Thank you!
Marco holds a PhD cum laude in applied machine learning, a M.Sc. cum laude in computer science engineering, and a M.Sc. cum laude in human movement sciences and high-performance coaching. He is a certified ultrarunning coach.
Marco has published more than 50 papers and patents at the intersection between physiology, health, technology, and human performance.
He is co-founder of HRV4Training, Endurance Coach, Guest Lecturer at VU Amsterdam, advisor at Oura, and Editor for IEEE Pervasive Computing Magazine.
Social:




Hi Marco, I am doing HRV with the Apple Watch now for 4 years, and i fully agree with your assessment.
There is one glitch I like to point out: I noticed that the Health App does not immediately update the HRV reading. It can happen that HRV4training reads the last value before the Breath App was used. Therefore I made it a habit to open the Health App after using Breath, and make sure that the latest reading is available in Health.
One feature that i am missing in HRV4training is a way to scroll through the Health App values and select the right one to be imported to HRV4TRAINING.
Also, the Limitation to the last 3 hrs of readings could be revised. Sometimes I take a reading but forget about it, but later I delete all “rubbish” values from Health and try to import, and HRV4TRAINING refuses, because the data is older than 3 hrs. I don’t really see why this Limitation is implemented.
Hi Marco, i wonder how long after i take measurement with apple watch do i have to read hrv from health. Must it be immediately after or can i do it later (time frame?)